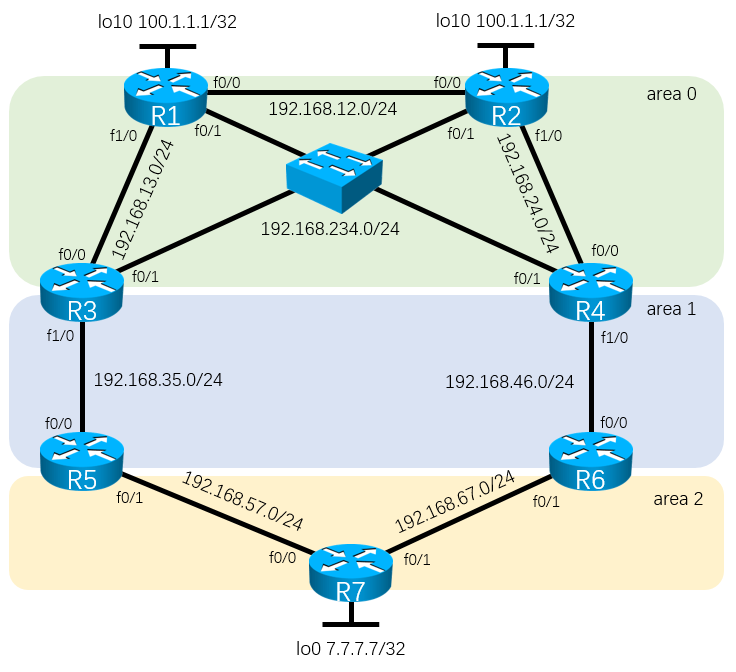
OSPF综合实验

需求
1,按照如图所示配置好路由器的接口地址。在每台路由器上必须建立loopback0接口。
2,配置好OSPF,区域划分如图所示,并且ospf的router-id必须为loopback0的地址。最终实现全网互联。
3,在R1、R2、R3、R4之间的多路访问网络里面,必须是的R1成为DR,R2成为BDR。在其余的链路里面必须保障OSPF邻居的快速建立,而不需要经过wait timer。
4,在R1和R2上建立loopback10,接口的地址为同样的100.1.1.1/32来模拟外网的接入。要求R1和R2都向内网通告一条缺省路由,正常的时候所有的路由器通过R1的缺省路由来访问外网,当R1无法正常工作的时候,通过R2来访问外网。(需要在R7上使用traceroute来测试路线。)
5,area
2为特殊区域,该区域无法学习到ospf其他区域的路由。R7的loopback0的地址通过redistributeconnected
subnets命令进入ospf。(观察R5和R6上的7.7.7.0路由的来源,思考原因。)
6,在R3上创建loopback1-3,地址为172.16.x.1/24(x为1-3)。并且宣告进OSPF区域1,要求在area
0只能看到一条汇总的路由172.16.0.0
7,area
0需要启用明文区域认证,R3和R5之间明文链路认证,R4和R6之间密文链路认证。
8,禁止area
2内的192.168.57.0/24和192.168.67.0/24被其他区域学习到。此刻思考区域0里面关于7.7.7.0的路由消失的原因,并且需要解决7.7.7.0消失的问题。
详解
基础IP配置和OSPF配置
R1
interface Loopback0
 ip address 1.1.1.1 255.255.255.0
 ip ospf 1 area 0
!
interface FastEthernet0/0
 ip address 192.168.12.1 255.255.255.0
 ip ospf network point-to-point\\改网络类型为点对点,为了满足题目3里面的跳过wait timer的需求。
 ip ospf 1 area 0
!
interface FastEthernet0/1
 ip address 192.168.234.1 255.255.255.0
 ip ospf priority 10\\改接口ospf的优先级,为了让R1成为DR
 ip ospf 1 area 0
!
interface FastEthernet1/0
 ip address 192.168.13.1 255.255.255.0
 ip ospf network point-to-point
 ip ospf 1 area 0
!
router ospf 1
 router-id 1.1.1.1\\设置OSPF的route-id,防止被其他的接口抢走route-id
============================================================================
R2
interface Loopback0
 ip address 2.2.2.2 255.255.255.0
 ip ospf 1 area 0
!
interface FastEthernet0/0
 ip address 192.168.12.2 255.255.255.0
 ip ospf network point-to-point
 ip ospf 1 area 0
!
interface FastEthernet0/1
 ip address 192.168.234.2 255.255.255.0
 ip ospf priority 5\\设置接口的优先级,让R2成为BDR
 ip ospf 1 area 0
!
interface FastEthernet1/0
 ip address 192.168.24.2 255.255.255.0
 ip ospf network point-to-point
 ip ospf 1 area 0
!
router ospf 1
 router-id 2.2.2.2
============================================================================
R3
interface Loopback0
 ip address 3.3.3.3 255.255.255.0
 ip ospf 1 area 0
!
interface FastEthernet0/0
 ip address 192.168.13.3 255.255.255.0
 ip ospf network point-to-point
 ip ospf 1 area 0
!
interface FastEthernet0/1
 ip address 192.168.234.3 255.255.255.0
 ip ospf 1 area 0
!
interface FastEthernet1/0
 ip address 192.168.35.3 255.255.255.0
 ip ospf network point-to-point
 ip ospf 1 area 1
!
router ospf 1
 router-id 3.3.3.3
 area 1 virtual-link 5.5.5.5\\虚链路别忘了!!!!!否则无法实现全网互联!!!
============================================================================
R4
interface Loopback0
 ip address 4.4.4.4 255.255.255.0
 ip ospf 1 area 0
!
interface FastEthernet0/0
 ip address 192.168.24.4 255.255.255.0
 ip ospf network point-to-point
 ip ospf 1 area 0
!
interface FastEthernet0/1
 ip address 192.168.234.4 255.255.255.0
 ip ospf 1 area 0
!
interface FastEthernet1/0
 ip address 192.168.46.4 255.255.255.0
 ip ospf network point-to-point
 ip ospf 1 area 1
!
router ospf 1
 router-id 4.4.4.4
 area 1 virtual-link 6.6.6.6\\虚链路别忘了!!!!!否则无法实现全网互联!!!
============================================================================
R5
interface Loopback0
 ip address 5.5.5.5 255.255.255.0
 ip ospf 1 area 0
!
interface FastEthernet0/0
 ip address 192.168.35.5 255.255.255.0
 ip ospf network point-to-point
 ip ospf 1 area 1
!
interface FastEthernet0/1
 ip address 192.168.57.5 255.255.255.0
 ip ospf network point-to-point
 ip ospf 1 area 2
!
router ospf 1
 router-id 5.5.5.5
 area 1 virtual-link 3.3.3.3\\虚链路别忘了!!!!!否则无法实现全网互联!!!
============================================================================
R6
interface Loopback0
 ip address 6.6.6.6 255.255.255.0
 ip ospf 1 area 0
!
interface FastEthernet0/0
 ip address 192.168.46.6 255.255.255.0
 ip ospf network point-to-point
 ip ospf 1 area 1
!
interface FastEthernet0/1
 ip address 192.168.67.6 255.255.255.0
 ip ospf network point-to-point
 ip ospf 1 area 2
!
router ospf 1
 router-id 6.6.6.6
 area 1 virtual-link 4.4.4.4\\虚链路别忘了!!!!!否则无法实现全网互联!!!
============================================================================
R7
interface Loopback0
 ip address 7.7.7.7 255.255.255.0
!
interface FastEthernet0/0
 ip address 192.168.57.7 255.255.255.0
 ip ospf network point-to-point
 ip ospf 1 area 2
!
interface FastEthernet0/1
 ip address 192.168.67.7 255.255.255.0
 ip ospf network point-to-point
 ip ospf 1 area 2
!
router ospf 1
 router-id 7.7.7.7
============================================================================
注意!!!!!!!!!!!!上述步骤完成后一定要逐台路由器检查邻居关系和直连情况
============================================================================
到此为止题目的1,2,3都已经满足,下面题目需求4
那个100.1.1.1是用来模拟外网的,意思是R1和R2都是可以上网的,比如R1连接的是电信,R2连接的是移动。那电信和移动都可以上百度,那么我就拿100.1.1.1来模拟百度。
R1
interface Loopback10
 ip address 100.1.1.1 255.255.255.255\\这个100.1.1.1只是模拟某个外网而已,比如模拟百度的ip。
!
router ospf 1
 default-information originate always\\总是通告一条缺省路由,来让不知道外网的路由器找到这里
============================================================================
R2
interface Loopback10
 ip address 100.1.1.1 255.255.255.255\\通过R2也可以到达这个地址,所以要在R2上也创建一个一样IP的接口,虽然我们实验里面不是同一台路由器,但是这个是实验环境。
!
router ospf 1
 default-information originate always metric 10\\增大了度量值,让内网不要优选R2走,除非R1坏了才从R2走。
============================================================================
下面是测试环节,在R7上使用traceroute来测试。
R7#traceroute 100.1.1.1
Type escape sequence to abort.
Tracing the route to 100.1.1.1
  1 192.168.67.6 36 msec
    192.168.57.5 24 msec
    192.168.67.6 36 msec
  2 192.168.35.3 52 msec
    192.168.46.4 96 msec
    192.168.35.3 64 msec
  3 192.168.234.1 128 msec
    192.168.13.1 92 msec
    192.168.234.1 100 msec
虽然有多条路可以去往,但是看第三个回应我们的,是R1上面的地址,证明此时是R1来帮助我们去往100.1.1.1的,下面在R1上输入
R1(config)#interface range f0/0 -1 , f1/0
R1(config-if-range)#shutdown
关闭R1的所有接口,这样模拟R1已经坏掉了,再次在R7上进行测试
R7#traceroute 100.1.1.1
Type escape sequence to abort.
Tracing the route to 100.1.1.1
  1 192.168.67.6 36 msec
    192.168.57.5 32 msec
    192.168.67.6 28 msec
  2 192.168.35.3 76 msec
    192.168.46.4 56 msec
    192.168.35.3 68 msec
  3 192.168.24.2 124 msec
    192.168.234.2 96 msec
    192.168.24.2 96 msec
这次发现第三个回应我们的,是R2上面的地址,证明我们已经完成了题目4的要求。别忘了恢复R1上面被关闭的接口!!!!!!!!
============================================================================
题目5的需求是设置一个特殊区域,然后用R7的lo0接口来模拟外部的路由。根据题目需求,应该是nssa no-summary区域,因为只有该区域不学习其他区域的路由,同时还允许外部路由的进入。
R5&R6&R7\\三台路由器都需要这两条命令!!!!!!!!!!!!!
router ospf 1
 area 2 nssa no-summary
============================================================================
R7
router ospf 1
 redistribute connected subnets\\用这条命令(CCNP后面会详细介绍)来模拟lo0接口是外网进入OSPF。请注意,上面的步骤并没有将该接口宣告进OSPF!!!
============================================================================
此刻观察R5或者R6应该会发现一台路由器的路由表7.7.7.0是O N2的路由,一台是O E2的路由。因为OSPF如果从多种LSA类型学习到同一个路由条目会遵循以下优选规则:
OSPF路由计算优选次序:
(1) 直连路由:本路由器发起的LSA 1、2;
(2) 区域内路由:O; LSA 1、2;
(3) 区域间路由:O IA; LSA 3;
(4) 1类外部路由:O E1; LSA 5类型1;
(5) 2类外部路由:O E2: LSA 5 类型2;
(6) 1类NSSA路由:O N1; LSA 7类型1;
(7) 2类NSSA路由:O N2; LSA 7类型2。
而如果R6先学习到了7.7.7.0通过7类的LSA,就会以O N2的方式进入路由表,然后作为ABR的R6会将该7类的LSA转换成5类的LSA进入其他区域,而R5就会收到两种类型的LSA来描述7.7.7.0,会优选5类的。
============================================================================
题目3是在R3上创建三个172.16.x.1/24的路由进入区域1,需要在区域0里面看到最后只有一条汇总的路由。
要注意,要想彻底的杜绝区域0出现明细,就需要在区域1和0的所有边界ABR做汇总,而本实验中,R3,R4,R5,R6都是区域1和0的边界ABR,别遗漏了!!!!
============================================================================
R3
interface Loopback1
 ip address 172.16.1.1 255.255.255.0
 ip ospf 1 area 1
!
interface Loopback2
 ip address 172.16.2.1 255.255.255.0
 ip ospf 1 area 1
!
interface Loopback3
 ip address 172.16.3.1 255.255.255.0
 ip ospf 1 area 1
============================================================================
R3&R5\\注意!!!!!!!!!!!!这2台路由器都是区域1和0的边界ABR。
router ospf 1
 area 1 range 172.16.0.0 255.255.0.0
============================================================================
上述步骤完成后,别忘了查看R1和R2的路由表,保证只能出现一条关于172.16.0.0/16的汇总路由
============================================================================
题目7纯粹就是命令,命令别敲错了就不会有啥问题。别忘了虚链路也是属于区域0,区域认证别忘了。
R1
router ospf 1
 area 0 authentication
============================================================================
R2
router ospf 1
 area 0 authentication
============================================================================
R3
router ospf 1
 area 0 authentication
interface FastEthernet1/0
 ip ospf authentication
 ip ospf authentication-key cisco
============================================================================
R4
router ospf 1
 area 0 authentication
interface FastEthernet1/0
 ip ospf authentication message-digest
 ip ospf message-digest-key 1 md5 cisco
============================================================================
R5
router ospf 1
 area 0 authentication
interface FastEthernet0/0
 ip ospf authentication
 ip ospf authentication-key cisco
============================================================================
R6
router ospf 1
 area 0 authentication
interface FastEthernet0/0
 ip ospf authentication message-digest
 ip ospf message-digest-key 1 md5 cisco
===========================================================================
在R5和R6上禁止192.168.57.0/24和192.168.67.0/24进入其他区域
R5&R6\\两台路由器都要输入命令!!!
router ospf 1
 area 2 range 192.168.57.0 255.255.255.0 not-advertise
 area 2 range 192.168.67.0 255.255.255.0 not-advertise
===========================================================================
会发现区域0里面的路由器除了R5和R6学习不到7.7.7.0了,通过查看database发现
R1#show ip ospf database external
            OSPF Router with ID (1.1.1.1) (Process ID 1)
                Type-5 AS External Link States
  Routing Bit Set on this LSA
  LS age: 9
  Options: (No TOS-capability, DC)
  LS Type: AS External Link
  Link State ID: 7.7.7.0 (External Network Number )
  Advertising Router: 6.6.6.6
  LS Seq Number: 80000005
  Checksum: 0x2E41
  Length: 36
  Network Mask: /24
        Metric Type: 2 (Larger than any link state path)
        TOS: 0
        Metric: 20
        Forward Address: 192.168.67.7\\该转发地址不可达,导致这条lsa虽然存在database中,但是也不会使用
        External Route Tag: 0
通过在R5和R6上修改7类转换成5类LSA时候的Fordward地址,实现转发地址可达。
R5&R6
router ospf 1
 area 2 nssa translate type7 suppress-fa
===========================================================================
最终检查区域0里面的路由器是不是又成功的学习到了7.7.7.0的路由,并且可以成功的去往该地址。

