路由重发布
- 路由重发布是指连接到不同自制系统(比如不同组织所管理的网络)的边界路由器,在他们之间交换和通告路由选择信息的能力。

- 从一种协议到另一种协议
- 同一种协议的不同实例互相传递
- 路由重发布对路由器而言是对外的,执行重发布的路由器路由表不会发生改变
- 路由条目必须要被执行重发布的路由器学到

R1(config)#int lo0
R1(config-if)#ip add 1.1.1.1 255.255.255.0
R1(config-router)#int e0/0
R1(config-if)#ip add 192.168.12.1 255.255.255.0
R1(config-if)#no sh
R1(config-if)#router rip
R1(config-router)#ver 2
R1(config-router)#no au
R1(config-router)#net 1.0.0.0
R1(config-router)#net 192.168.12.0
R2(config)#int lo0
R2(config-if)#ip add 2.2.2.2 255.255.255.0
R2(config-if)#ip ospf 1 area 0
R2(config-if)#int e0/0
R2(config-if)#ip add 192.168.12.2 255.255.255.0
R2(config-if)#no sh
R2(config-if)#int e0/1
R2(config-if)#ip add 192.168.23.2 255.255.255.0
R2(config-if)#ip ospf 1 area 0
R2(config-if)#no sh
R2(config)#router rip
R2(config-router)#ver 2
R2(config-router)#no au
R2(config-router)#net 192.168.12.0R3(config)#int lo0
R3(config-if)#ip add 3.3.3.3 255.255.255.0
R3(config-if)#ip ospf 1 area 0
R3(config-if)#int e0/0
R3(config-if)#ip add 192.168.23.3 255.255.255.0
R3(config-if)#no sh
R3(config-if)#ip ospf 1 area 0在R2上检查路由条目,确保OSPF和RIP的路由都被学到
R2#show ip route
      1.0.0.0/24 is subnetted, 1 subnets
R        1.1.1.0 [120/1] via 192.168.12.1, 00:00:03, Ethernet0/0
      2.0.0.0/8 is variably subnetted, 2 subnets, 2 masks
C        2.2.2.0/24 is directly connected, Loopback0
L        2.2.2.2/32 is directly connected, Loopback0
      3.0.0.0/32 is subnetted, 1 subnets
O        3.3.3.3 [110/11] via 192.168.23.3, 00:00:24, Ethernet0/1
      192.168.12.0/24 is variably subnetted, 2 subnets, 2 masks
C        192.168.12.0/24 is directly connected, Ethernet0/0
L        192.168.12.2/32 is directly connected, Ethernet0/0
      192.168.23.0/24 is variably subnetted, 2 subnets, 2 masks
C        192.168.23.0/24 is directly connected, Ethernet0/1
L        192.168.23.2/32 is directly connected, Ethernet0/1
在R2上进行重发布,在RIP中,将OSPF的条目放进来,需要注意度量值
R2(config)#router rip
R2(config-router)#redistribute ospf 1 metric 5
# 将OSPF1的条目放到RIP中,度量值设置为5
检查R1的路由表
R1#sh ip route rip
      2.0.0.0/24 is subnetted, 1 subnets
R        2.2.2.0 [120/5] via 192.168.12.2, 00:00:26, Ethernet0/0
      3.0.0.0/32 is subnetted, 1 subnets
R        3.3.3.3 [120/5] via 192.168.12.2, 00:00:26, Ethernet0/0
R     192.168.23.0/24 [120/5] via 192.168.12.2, 00:00:26, Ethernet0/0
在R2上进行重发布,在OSPF中,将RIP的条目放进来
R2(config)#router ospf 1
R2(config-router)#redistribute rip subnets
# subnets是将子网条目也加入重发布
在R3上查看路由表
R3#sh ip route
      1.0.0.0/24 is subnetted, 1 subnets
O E2     1.1.1.0 [110/20] via 192.168.23.2, 00:00:04, Ethernet0/0
      2.0.0.0/32 is subnetted, 1 subnets
O        2.2.2.2 [110/11] via 192.168.23.2, 00:06:23, Ethernet0/0
      3.0.0.0/8 is variably subnetted, 2 subnets, 2 masks
C        3.3.3.0/24 is directly connected, Loopback0
L        3.3.3.3/32 is directly connected, Loopback0
O E2  192.168.12.0/24 [110/20] via 192.168.23.2, 00:00:04, Ethernet0/0
      192.168.23.0/24 is variably subnetted, 2 subnets, 2 masks
C        192.168.23.0/24 is directly connected, Ethernet0/0
L        192.168.23.3/32 is directly connected, Ethernet0/0
重发布进OSPF的时候,会有默认种子度量值是20,并且默认是O E2的类型,也就是在OSPF内部传递不增加开销。
R1#ping 3.3.3.3
Type escape sequence to abort.
Sending 5, 100-byte ICMP Echos to 3.3.3.3, timeout is 2 seconds:
!!!!!
Success rate is 100 percent (5/5), round-trip min/avg/max = 1/1/1 ms
重发布的问题
度量值
- 不同的路由协议度量值的定义不一样,比如RIP是跳数,OSPF是开销。所以在重发布的时候,需要根据不同的协议给一个初始的度量值。
- 种子度量值,不同的协议在重发布的时候会有一个默认的度量值,如果不定义度量值,就会用默认度量值。
| 将路由重发布到的协议 | 默认种子度量值 |
|---|---|
| RIP | 0,默认视为无穷大,不学习 |
| EIGRP | 0,默认视为无穷大,不学习 |
| OSPF | BGP以外其他协议到OSPF是20,OSPF不同实例会互相继承度量值 |
| ISIS | 0 |
| BGP | 保留重发布之前的度量值 |
- 一般在协议配置模式下,可以使用
default-metric来修改 - 推荐在
redistribute的时候使用metric进行指定
管理距离

R1(config)#int lo0
R1(config-if)#ip add 1.1.1.1 255.255.255.0
R1(config-if)#ip ospf 1 area 0
R1(config-if)#int e0/0
R1(config-if)#ip add 192.168.12.1 255.255.255.0
R1(config-if)#no sh
R1(config-if)#ip ospf 1 area 0
R1(config-if)#int e0/1
R1(config-if)#ip add 192.168.13.1 255.255.255.0
R1(config-if)#no sh
R1(config-if)#ip ospf 1 area 0
R2(config)#int lo0
R2(config-if)#ip add 2.2.2.2 255.255.255.0
R2(config-if)#ip ospf 1 area 0
R2(config-if)#int e0/1
R2(config-if)#ip add 192.168.24.2 255.255.255.0
R2(config-if)#no sh
R2(config-if)#int e0/0
R2(config-if)#ip add 192.168.12.2 255.255.255.0
R2(config-if)#no sh
R2(config-if)#ip ospf 1 area 0
R2(config-if)#router rip
R2(config-router)#ver 2
R2(config-router)#no au
R2(config-router)#net 192.168.24.0R3(config)#int lo0
R3(config-if)#ip add 3.3.3.3 255.255.255.0
R3(config-if)#ip ospf 1 area 0
R3(config-if)#int e0/0
R3(config-if)#ip add 192.168.13.3 255.255.255.0
R3(config-if)#no sh
R3(config-if)#ip ospf 1 area 0
R3(config-if)#int e0/1
R3(config-if)#ip add 192.168.34.3 255.255.255.0
R3(config-if)#no sh
R3(config-if)#router rip
R3(config-router)#ver 2
R3(config-router)#no au
R3(config-router)#net 192.168.34.0R4(config)#int lo0
R4(config-if)#ip add 4.4.4.4 255.255.255.0
R4(config-if)#int e0/0
R4(config-if)#ip add 192.168.24.4 255.255.255.0
R4(config-if)#no sh
R4(config-if)#int e0/1
R4(config-if)#ip add 192.168.34.4 255.255.255.0
R4(config-if)#no sh
R4(config)#int e0/2
R4(config-if)#ip add 192.168.45.4 255.255.255.0
R4(config-if)#no sh
R4(config-if)#router rip
R4(config-router)#ver 2
R4(config-router)#no au
R4(config-router)#net 4.0.0.0
R4(config-router)#net 192.168.24.0
R4(config-router)#net 192.168.34.0
R4(config-router)#net 192.168.45.0R5(config)#int lo0
R5(config-if)#ip add 5.5.5.5 255.255.255.0
R5(config-if)#int e0/0
R5(config-if)#ip add 192.168.45.5 255.255.255.0
R5(config-if)#no sh
R5(config-if)#router rip
R5(config-router)#ver 2
R5(config-router)#no au
R5(config-router)#net 5.0.0.0
R5(config-router)#net 192.168.45.0然后我们在R2和R3上进行双向路由重发布
R2(config)#router rip
R2(config-router)#red ospf 1 me 1
R2(config-router)#router ospf 1
R2(config-router)#red rip sub
====================================
R3(config)#router rip
R3(config-router)#red ospf 1 me 1
R3(config-router)#router ospf 1
R3(config-router)#red rip su我们去R2和R3的路由表里面观察5.5.5.0/24这条路由
R2#sh ip route
      5.0.0.0/24 is subnetted, 1 subnets
R        5.5.5.0 [120/2] via 192.168.24.4, 00:00:19, Ethernet0/1
========================================================
R3#sh ip route
      5.0.0.0/24 is subnetted, 1 subnets
O E2 5.5.5.0 [110/20] via 192.168.13.1, 00:01:28, Ethernet0/0R3上的5.5.5.0/24并没有选择最佳路线,而是选择从R1绕一圈。
再观察R4的路由表中5.5.5.0/24
R4#sh ip route
      5.0.0.0/24 is subnetted, 1 subnets
R        5.5.5.0 [120/1] via 192.168.45.5, 00:00:24, Ethernet0/2
[120/1] via 192.168.34.3, 00:00:08, Ethernet0/1发现R4中5.5.5.0/24负载均衡,两个下一跳,其中192.168.34.3会导致环路。
次优路径
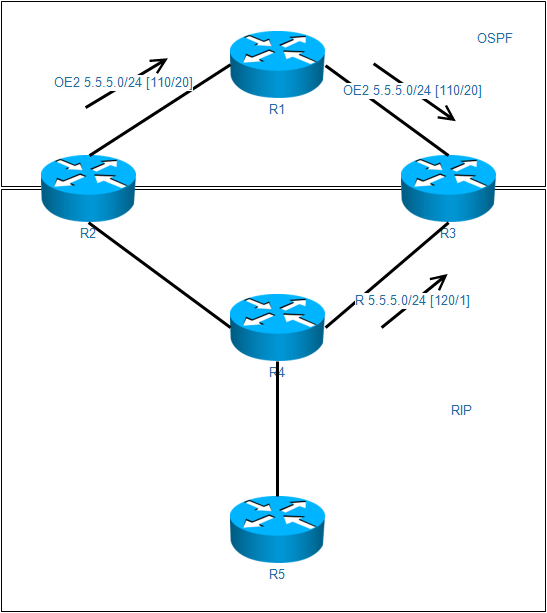
对于R3而言,OSPF的5.5.5.0/24管理距离为110,RIP的5.5.5.0/24管理距离为120,所以R3会选择从R1走,造成次优路径
如果出现双向多点重发布,那么在管理距离小的那边会出现次优路径
路由倒灌
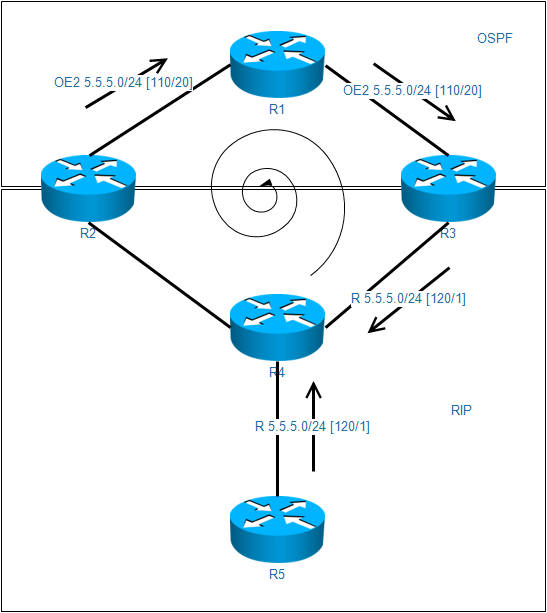
由于R3选择了OSPF的路由条目,那么就回将条目重发布到RIP中,从而导致R4的学习。
各种协议路由重发布实验

R5上面配置静态路由,再配置一个loopback接口
最终实现都能学到路由
步骤1,配置所有路由器的路由协议,让R5学到每个路由器的loopback0接口
R1(config)#int lo0
R1(config-if)#ip add 1.1.1.1 255.255.255.0
R1(config-if)#int e0/0
R1(config-if)#ip add 192.168.15.1 255.255.255.0
R1(config-if)#no sh
R1(config-if)#router rip
R1(config-router)#ver 2
R1(config-router)#no au
R1(config-router)#net 1.0.0.0
R1(config-router)#net 192.168.15.0
R2(config-if)#int lo0
R2(config-if)#ip add 2.2.2.2 255.255.255.0
R2(config-if)#int e0/0
R2(config-if)#ip add 192.168.25.2 255.255.255.0
R2(config-if)#no sh
R2(config-if)#router eigrp 100
R2(config-router)#net 2.0.0.0
R2(config-router)#net 192.168.25.0R3(config)#int lo0
R3(config-if)#ip add 3.3.3.3 255.255.255.0
R3(config-if)#ip ospf 1 area 0
R3(config-if)#int e0/0
R3(config-if)#ip add 192.168.35.3 255.255.255.0
R3(config-if)#no sh
R3(config-if)#ip ospf 1 area 0R4(config)#router isis
R4(config-router)#net 49.0001.0000.0000.0004.00
R4(config-router)#is-type level-2
R4(config-if)#int lo0
R4(config-if)#ip add 4.4.4.4 255.255.255.0
R4(config-if)#ip router isis
R4(config-if)#int e0/0
R4(config-if)#ip add 192.168.45.4 255.255.255.0
R4(config-if)#no sh
R4(config-if)#ip router isisR5(config)#int lo0
R5(config-if)#ip add 5.5.5.5 255.255.255.0
R5(config-if)#int e0/0
R5(config-if)#ip add 192.168.15.5 255.255.255.0
R5(config-if)#no sh
R5(config-if)#int e0/1
R5(config-if)#ip add 192.168.25.5 255.255.255.0
R5(config-if)#no sh
R5(config-if)#int e0/2
R5(config-if)#ip add 192.168.35.5 255.255.255.0
R5(config-if)#no sh
R5(config-if)#ip ospf 1 area 0
R5(config-if)#int e0/3
R5(config-if)#ip add 192.168.45.5 255.255.255.0
R5(config-if)#no sh
R5(config-if)#router rip
R5(config-router)#ver 2
R5(config-router)#no au
R5(config-router)#net 192.168.15.0
R5(config-router)#router eigrp 100
R5(config-router)#net 192.168.25.0
R5(config-router)#router isis
R5(config-router)#net 49.0001.0000.0000.0005.00
R5(config-router)#is-type level-2
R5(config-router)#int e0/3
R5(config-if)#ip router isis
R5(config)#ip route 10.0.0.0 255.0.0.0 null0检查R5的路由表
R5#sh ip route
      1.0.0.0/24 is subnetted, 1 subnets
R        1.1.1.0 [120/1] via 192.168.15.1, 00:00:01, Ethernet0/0
      2.0.0.0/24 is subnetted, 1 subnets
D        2.2.2.0 [90/409600] via 192.168.25.2, 00:02:09, Ethernet0/1
      3.0.0.0/32 is subnetted, 1 subnets
O        3.3.3.3 [110/11] via 192.168.35.3, 00:02:24, Ethernet0/2
      4.0.0.0/24 is subnetted, 1 subnets
i L2     4.4.4.0 [115/20] via 192.168.45.4, 00:01:48, Ethernet0/3
      5.0.0.0/8 is variably subnetted, 2 subnets, 2 masks
C        5.5.5.0/24 is directly connected, Loopback0
L        5.5.5.5/32 is directly connected, Loopback0
S     10.0.0.0/8 is directly connected, Null0
      192.168.15.0/24 is variably subnetted, 2 subnets, 2 masks
C        192.168.15.0/24 is directly connected, Ethernet0/0
L        192.168.15.5/32 is directly connected, Ethernet0/0
      192.168.25.0/24 is variably subnetted, 2 subnets, 2 masks
C        192.168.25.0/24 is directly connected, Ethernet0/1
L        192.168.25.5/32 is directly connected, Ethernet0/1
      192.168.35.0/24 is variably subnetted, 2 subnets, 2 masks
C        192.168.35.0/24 is directly connected, Ethernet0/2
L        192.168.35.5/32 is directly connected, Ethernet0/2
      192.168.45.0/24 is variably subnetted, 2 subnets, 2 masks
C        192.168.45.0/24 is directly connected, Ethernet0/3
L        192.168.45.5/32 is directly connected, Ethernet0/3
步骤2,在R5对各个协议进行重发布
=========RIP<-EIGRP=========
=========RIP<-OSPF=========
=========RIP<-ISIS=========
=========RIP<-Static=========
=========RIP<-connected=========
router rip
 redistribute static metric 5
 redistribute connected metric 5
 redistribute ospf 1 metric 5
 redistribute eigrp 100 metric 5
 redistribute isis level-1-2 metric 5
=========EIGRP<-RIP=========
=========EIGRP<-OSPF=========
=========EIGRP<-ISIS=========
=========EIGRP<-Static=========
=========EIGRP<-connected=========
router eigrp 100
 redistribute rip metric 10000 100 255 1 1500
 redistribute ospf 1 metric 10000 100 255 1 1500
 redistribute isis level-1-2 metric 10000 100 255 1 1500
 redistribute static metric 10000 100 255 1 1500
 redistribute connected metric 10000 100 255 1 1500
=========OSPF<-RIP=========
=========OSPF<-EIGRP=========
=========OSPF<-ISIS=========
=========OSPF<-Static=========
=========OSPF<-connected=========
router ospf 1
 redistribute connected subnets
 redistribute static subnets
 redistribute rip subnets
 redistribute eigrp 100 subnets
 redistribute isis level-1-2 subnets
=========ISIS<-RIP=========
=========ISIS<-EIGRP=========
=========ISIS<-OSPF=========
=========ISIS<-Static=========
=========ISIS<-connected=========
router isis
 redistribute connected
 redistribute static ip
 redistribute ospf 1
 redistribute rip
 redistribute eigrp 100
在其他路由器上查看路由表,确认路由全部学习到
R1#sh ip route rip
      2.0.0.0/24 is subnetted, 1 subnets
R        2.2.2.0 [120/5] via 192.168.15.5, 00:00:21, Ethernet0/0
      3.0.0.0/32 is subnetted, 1 subnets
R        3.3.3.3 [120/5] via 192.168.15.5, 00:00:21, Ethernet0/0
      4.0.0.0/24 is subnetted, 1 subnets
R        4.4.4.0 [120/5] via 192.168.15.5, 00:00:21, Ethernet0/0
      5.0.0.0/24 is subnetted, 1 subnets
R        5.5.5.0 [120/1] via 192.168.15.5, 00:00:21, Ethernet0/0
R     10.0.0.0/8 [120/5] via 192.168.15.5, 00:00:14, Ethernet0/0
R     192.168.25.0/24 [120/1] via 192.168.15.5, 00:00:21, Ethernet0/0
R     192.168.35.0/24 [120/1] via 192.168.15.5, 00:00:21, Ethernet0/0
R     192.168.45.0/24 [120/1] via 192.168.15.5, 00:00:21, Ethernet0/0
被动接口

在某些情况下,需要将终端设备所在的网段加入路由协议中,但是不希望在和终端设备连接的接口上发出协议相关的数据,或者建立邻居关系,可以配置为被动接口。
- RIP
- 在指定接口不向外发送路由更新,但是接收路由更新
- EIGRP
- 在指定接口不向外发送Hello消息,而且通过这个接口不与其他路由器建立邻居关系,不发送其他EIGRP的数据流。
- OSPF
- 在指定接口不向外发送Hello消息,不建立邻居关系。
R1(config-router)#passive-interface e0/0R1(config-router)#passive-interface default
R1(config-router)#no passive-interface e0/0
我们想让办公区域的网段被其他路由器学习到,但是不希望终端PC可以收到路由协议相关消息。
R1R2R3都配置ip ospf 1 area 0,其中R3的e0/1接口连接的PC
方法一:
将R3的e0/1接口加入OSPF,这样其他路由器都可以访问PC
interface Ethernet0/1
 ip ospf 1 area 0
R1#ping 192.168.1.2
Type escape sequence to abort.
Sending 5, 100-byte ICMP Echos to 192.168.1.2, timeout is 2 seconds:
!!!!!
Success rate is 100 percent (5/5), round-trip min/avg/max = 1/1/2 ms但是这个时候PC可以收到OSPF建立邻居的请求
在R3的上配置被动接口
R3(config)#router ospf 1
R3(config-router)#passive-interface e0/1
方法二:
将R3的e0/1接口重发布进OSPF
R3(config-if)#router ospf 1
R3(config-router)#redistribute connected subnets
操纵管理距离

- 上表为cisco设备的默认管理距离,不同的厂商管理距离不一样,甚至称呼都不一样,但是功能是一样的
- 路由器从不同的来源,收到同一个路由条目,优先比较管理距离,越小越优。如果管理距离一样,才会比较度量值。
- 常见路由协议都支持修改度量值,修改的值只有本地有效,不会影响其他路由器。
上述次优路径和路由倒灌可以使用修改管理距离来解决。
在R3上,针对R2重发布过来的条目,管理距离改为121,这样R3就不会学习OSPF传过来的外部路由
R3
router ospf 1
 distance 121 2.2.2.2 0.0.0.0
查看R3的路由表
R3#show ip route ospf
      1.0.0.0/32 is subnetted, 1 subnets
O        1.1.1.1 [110/11] via 192.168.13.1, 00:00:27, Ethernet0/0
      2.0.0.0/8 is variably subnetted, 2 subnets, 2 masks
O        2.2.2.2/32 [121/21] via 192.168.13.1, 00:00:27, Ethernet0/0
      5.0.0.0/24 is subnetted, 1 subnets
O E2     5.5.5.0 [121/20] via 192.168.13.1, 00:00:27, Ethernet0/0
O     192.168.12.0/24 [121/20] via 192.168.13.1, 00:00:27, Ethernet0/0
管理距离修改成功,但是问题没有解决,因为RIP的水平分割,由于R4收到了R3的更新,就会不再更新回去。所以R3收不到RIP的更新。
可以尝试将R3的e0/0接口关闭再打开,这样R4就回发送更新给R3,R3就会发现RIP的条目120,OSPF的条目121
R3
int e0/0
sh
=====等到路由表中学习到RIP条目==========
no sh
检查R3的路由表,发现正常了
R3#sh ip route
      1.0.0.0/32 is subnetted, 1 subnets
O        1.1.1.1 [110/11] via 192.168.13.1, 00:00:53, Ethernet0/0
      2.0.0.0/8 is variably subnetted, 2 subnets, 2 masks
R        2.2.2.0/24 [120/2] via 192.168.34.4, 00:00:02, Ethernet0/1
O        2.2.2.2/32 [121/21] via 192.168.13.1, 00:00:53, Ethernet0/0
      3.0.0.0/8 is variably subnetted, 2 subnets, 2 masks
C        3.3.3.0/24 is directly connected, Loopback0
L        3.3.3.3/32 is directly connected, Loopback0
      4.0.0.0/24 is subnetted, 1 subnets
R        4.4.4.0 [120/1] via 192.168.34.4, 00:00:02, Ethernet0/1
      5.0.0.0/24 is subnetted, 1 subnets
R        5.5.5.0 [120/2] via 192.168.34.4, 00:00:02, Ethernet0/1
R     192.168.12.0/24 [120/2] via 192.168.34.4, 00:00:02, Ethernet0/1
      192.168.13.0/24 is variably subnetted, 2 subnets, 2 masks
C        192.168.13.0/24 is directly connected, Ethernet0/0
L        192.168.13.3/32 is directly connected, Ethernet0/0
R     192.168.24.0/24 [120/1] via 192.168.34.4, 00:00:02, Ethernet0/1
      192.168.34.0/24 is variably subnetted, 2 subnets, 2 masks
C        192.168.34.0/24 is directly connected, Ethernet0/1
L        192.168.34.3/32 is directly connected, Ethernet0/1
R     192.168.45.0/24 [120/1] via 192.168.34.4, 00:00:02, Ethernet0/1
由于拓扑是对称的,这个时候R2其实已经出现次优路径
R2(config)#router ospf 1
R2(config-router)#distance 121 3.3.3.3 0.0.0.0
R2(config)#int e0/0
R2(config-if)#sh
=====等到路由表中学习到RIP条目==========
R2(config-if)#no sh
查看路由表之后,我们发现了新的不合理的地方
R2#sh ip route rip
      3.0.0.0/8 is variably subnetted, 2 subnets, 2 masks
R        3.3.3.0/24 [120/2] via 192.168.24.4, 00:00:13, Ethernet0/1
# R3从RIP那边学来了,因为管理距离的原因
推荐用ACL将需要修改的条目匹配出来进行更改管理距离
access-list 1 permit 4.4.4.0
access-list 1 permit 5.5.5.0
access-list 1 permit 192.168.45.0
router ospf 1
 distance 121 2.2.2.2 0.0.0.0 1
Route-map
上面的案例修改管理距离使用ACL将路由匹配出来其实并不灵活
RIP网络只要新的条目增加,就不在ACL匹配范围了。
我们可以在R2和R3重发布路由的时候,对路由条目属性进行操作,比如加上标签,用于识别。
route-map可以针对路由,做出操作,比如允许拒绝,比如允许但是要加上什么属性。
用途
- 重发布期间进行路由过滤或执行策略
- PBR(策略路由)
- NAT
- BGP中的策略部署
- 无数种用法
语法
route-map <名字> permit/deny <序列号>
 match <条件1>				# 条件1和条件2都要匹配,and
 match <条件2>
 set <动作1>
 set <动作2>
route-map <同一个名字> permit/deny <序列号>
 match <条件1> <条件2>			# 条件1或者条件2有一个匹配就可以,or
 set <动作1>
 set <动作2>
特点
- 使用match命令匹配特定的分组或路由,set修改该分组或路由的相关属性
- route-map中的每个序列号是匹配过程中的顺序
- route-map默认位permit,默认序列号为10,不会自动递增,建议以十递增
- 末尾隐含deny any
- 逐条匹配,一旦命中,就执行动作,不再向下匹配,所以建议将条件严格的放在上面
次优路径和路由倒灌可以用route-map来解决
先还原实验环境,也就是删除上面改管理距离的命令
R2
route-map r-o permit 10
 set tag 666
router ospf 1
 redistribute rip subnets route-map r-o
在R1和R3上可以看到这个路由标记
R1#sh ip route 192.168.24.0
Routing entry for 192.168.24.0/24
  Known via "ospf 1", distance 110, metric 20
  Tag 666, type extern 2, forward metric 10
  Last update from 192.168.12.2 on Ethernet0/0, 00:01:33 ago
  Routing Descriptor Blocks:
  * 192.168.12.2, from 2.2.2.2, 00:01:33 ago, via Ethernet0/0
      Route metric is 20, traffic share count is 1
      Route tag 666
在路由条目进入R3 ospf的时候,我们加上过滤
route-map ospf deny 10
 match tag 666
route-map ospf permit 20
router ospf 1
 distribute-list route-map ospf in
实验

自己做
分发列表(Distribute-list)
- 主要用来在进出路由表的时候过滤路由条目
在使用的时候需要明确是in还是out方向
对于距离矢量路由协议

- 上面红色箭头标注的地方都是可以用分发列表进行过滤
- 对于链路状态路由协议

- 由于链路状态路由协议不是传递的路由表,所以只能在上图中红色箭头处使用

在RIP下的使用
R2(config)#access-list 1 deny 172.16.1.0
R2(config)#access-list 1 permit any
R2(config)#router rip
R2(config-router)#distribute-list 1 in
查看R2和R3的路由表
R2#sh ip route rip
      1.0.0.0/24 is subnetted, 1 subnets
R        1.1.1.0 [120/1] via 192.168.12.1, 00:00:02, Ethernet0/0
      3.0.0.0/24 is subnetted, 1 subnets
R        3.3.3.0 [120/1] via 192.168.23.3, 00:00:02, Ethernet0/1
      172.16.0.0/24 is subnetted, 1 subnets
R        172.16.2.0 [120/1] via 192.168.12.1, 00:00:02, Ethernet0/0
R3#sh ip route rip
      1.0.0.0/24 is subnetted, 1 subnets
R        1.1.1.0 [120/2] via 192.168.23.2, 00:00:02, Ethernet0/0
      2.0.0.0/24 is subnetted, 1 subnets
R        2.2.2.0 [120/1] via 192.168.23.2, 00:00:02, Ethernet0/0
      172.16.0.0/24 is subnetted, 1 subnets
R        172.16.2.0 [120/2] via 192.168.23.2, 00:00:02, Ethernet0/0
R     192.168.12.0/24 [120/1] via 192.168.23.2, 00:00:02, Ethernet0/0
在距离矢量路由协议中,使用in方向,会影响路由器自身和下游所有路由器
使用out方向,只会影响下游路由器
在OSPF下使用
R2(config)#access-list 1 deny   172.16.1.1
R2(config)#access-list 1 permit any
R2(config)#router ospf 1
R2(config-router)#distribute-list 1 in
查看R2和R3的路由表
R2#sh ip route ospf
      1.0.0.0/32 is subnetted, 1 subnets
O        1.1.1.1 [110/11] via 192.168.12.1, 00:00:22, Ethernet0/0
      3.0.0.0/32 is subnetted, 1 subnets
O        3.3.3.3 [110/11] via 192.168.23.3, 00:00:22, Ethernet0/1
      172.16.0.0/32 is subnetted, 1 subnets
O        172.16.2.1 [110/11] via 192.168.12.1, 00:00:22, Ethernet0/0
R3#sh ip route ospf
      1.0.0.0/32 is subnetted, 1 subnets
O        1.1.1.1 [110/21] via 192.168.23.2, 00:00:02, Ethernet0/0
      2.0.0.0/32 is subnetted, 1 subnets
O        2.2.2.2 [110/11] via 192.168.23.2, 00:00:02, Ethernet0/0
      172.16.0.0/32 is subnetted, 2 subnets
O        172.16.1.1 [110/21] via 192.168.23.2, 00:00:02, Ethernet0/0
O        172.16.2.1 [110/21] via 192.168.23.2, 00:00:02, Ethernet0/0
O     192.168.12.0/24 [110/20] via 192.168.23.2, 00:00:02, Ethernet0/0
在链路状态路由协议中,使用in方向,只会影响自己,不影响下游路由器
在链路状态路由协议中,使用out方向,只能在ASBR上对5类LSA条目影响
前缀列表(Prefix-list)
- 标准acl在匹配路由条目的时候,只能匹配到IP地址,不能匹配到子网掩码
- 扩展访问控制列表可以匹配子网掩码,但是匹配一个范围的时候较麻烦
比如我要匹配如下4条路由:
192.168.8.0/24
192.168.9.0/24
192.168.10.0/24
192.168.11.0/24
如果用标准的访问控制列表,只能这样写
access-list 1 permit 192.168.8.0 0.0.3.0
但是这么做了以后匹配的就可能是一大堆路由,虽然IP部分看起来一样,但是子网掩码不一样,在路由表中就是不同条目。
192.168.8.0/25
192.168.9.0/16
比如上面这两条也被匹配了
可以使用扩展访问控制列表
access-list 100 permit 192.168.8.0 0.0.3.0 255.255.255.0 0.0.0.0
- 前缀列表的可控性比访问控制列表高很多
- 可匹配路由前缀中的网络号长度,增加了匹配精确度
- 前缀列表中包含序列号,默认是5递增
- 最后隐含拒绝所有
- 在匹配路由条目的地方,都可以套用前缀列表
ip prefix-list test permit 192.168.8.0/22 ge 24 le 24
示例
匹配某条特定路由: 192.168.1.0/24
ip prefix-list test permit 192.168.1.0/24
匹配默认路由
ip prefix-list test permit 0.0.0.0/0
匹配所有主机路由
ip prefix-list test permit 0.0.0.0/0 ge 32
匹配所有路由
ip prefix-list test permit 0.0.0.0/0 le 32
偏移列表(Offset-list)
主要用在距离矢量路由协议上,用来在出入路由表的时候增加度量值

R1(config)#access-list 1 permit 1.1.1.0
R1(config)#router rip
R1(config-router)#offset-list 1 out 9
在R2上查看路由表
R2#sh ip route rip
      1.0.0.0/24 is subnetted, 1 subnets
R        1.1.1.0 [120/10] via 192.168.12.1, 00:00:01, Ethernet0/0
策略路由(Policy-based routing)
- 传统的路由在负载均衡的时候,会按照
traffic share count的比例来转发数据 - 策略路由会根据流量的不同属性,去决定路径

R4作为学校的出口,需要对学校内部的网络流量做一个资源分配
前提条件
R4#sh ip route
      1.0.0.0/32 is subnetted, 1 subnets
O        1.1.1.1 [110/21] via 192.168.34.3, 00:03:25, Ethernet0/1
                 [110/21] via 192.168.24.2, 00:03:35, Ethernet0/0
# 去往目的地必须要有两条路才能分配
R4(config)#access-list 1 permit 192.168.56.0 0.0.0.255
R4(config)#access-list 2 permit 192.168.57.0 0.0.0.255
R4(config)#route-map pbr permit
R4(config-route-map)#match ip add 1
R4(config-route-map)#set ip next-hop 192.168.24.2 192.168.34.3
R4(config-route-map)#route-map pbr per 20
R4(config-route-map)#set ip next-hop 192.168.34.3
R4(config)#int e0/2
R4(config-if)#ip policy route-map pbr测试是否生效
R6#traceroute 1.1.1.1
Type escape sequence to abort.
Tracing the route to 1.1.1.1
VRF info: (vrf in name/id, vrf out name/id)
  1 192.168.56.5 0 msec 0 msec 0 msec
  2 192.168.45.4 0 msec 0 msec 0 msec
  3 192.168.24.2 1 msec 1 msec 1 msec
  4 192.168.12.1 0 msec *  2 msec
R7#traceroute 1.1.1.1
Type escape sequence to abort.
Tracing the route to 1.1.1.1
VRF info: (vrf in name/id, vrf out name/id)
  1 192.168.57.5 1 msec 0 msec 1 msec
  2 192.168.45.4 0 msec 1 msec 0 msec
  3 192.168.34.3 1 msec 1 msec 1 msec
  4 192.168.13.1 1 msec *  1 msec
下面关闭电信,查看流量的走向
R4(config)#int e0/0
R4(config-if)#sh
R6#traceroute 1.1.1.1
Type escape sequence to abort.
Tracing the route to 1.1.1.1
VRF info: (vrf in name/id, vrf out name/id)
  1 192.168.56.5 0 msec 0 msec 0 msec
  2 192.168.45.4 1 msec 0 msec 0 msec
  3 192.168.34.3 1 msec 0 msec 0 msec
  4 192.168.13.1 1 msec *  1 msec
网关也可以让管理流量优先有电信
R4(config)#route-map pbr permit 30
R4(config-route-map)#set ip next-hop 192.168.24.2 192.168.34.3
R4(config)#ip local policy route-map pbr
测试
R4#traceroute 1.1.1.1
Type escape sequence to abort.
Tracing the route to 1.1.1.1
VRF info: (vrf in name/id, vrf out name/id)
  1 192.168.24.2 0 msec 1 msec 0 msec
  2 192.168.12.1 0 msec *  0 msec
实验练习
拓扑

需求
- 所有路由器全部启环回接口0 ,地址为X.X.X.X/32 X=路由器编号,接口地址使用192.168.X.Y X=相连路由器标号组合,例如R1和R2就使用X=12 Y=路由器编号
- R1和R2起RIPv2协议,R1建立3个环回接口,地址为172.16.X.1/24 X=1-3 只允许R1和R2之间存在更新,并且R2要只看到一条172.16网段的路由,并且这条路由不允许通告到其它网络
- R2、R3和R4的E0/0接口启EIGRP 100 R2、R3和R4的环回接口通告到EIGRP中
- R3、R4和R5启用OSPF
- 在R6只要看到直连路由和关于OSPF的一条默认路由
- R6上重分布直连环回接口,只重分布一个环回接口,需过滤其它端口
- R2上双向的重分发,R3和R4都做OSPF和EIGRP的双向重分发,并使OSPF路由器优先选择R3为主路由,当R3 down掉,使用路由器R4为可用下一跳
- 实验完成后需要全网通信,使用traceroute验证路由下一跳是否正确,重点观察R2 R3 R4的路由下一跳

